Posts | Tags | Archive

cd shortcuts with CDPATH and bash tab completion

For years I've had some fairly hacky ways of changing directories quicker. I'd wager a nickel these kind of aliases are pretty common:

alias cdblog='cd ~/sites/my_blog'
alias cdapp='cd ~/repos/my_app'

That grows pretty unwieldy when working with a bunch of repos. So then I thought I was super clever by using bash functions to cd directly into a git repo, since all my repos were in one of two parent dirs:

function repos(){ cd ~/repos/$1; }
function sites(){ cd ~/sites/$1; }

me@local$ repo my_app
me@local$ sites my_blog

It was a bit more typing, but fewer aliases to remember and more scalable. However the loss of tab completion using this method is a bummer.

When I finally got annoyed enough to look for a better way, of course it was waiting for me in a superuser post. Using the CDPATH environment variable and the bash-completion package (same name on centos/fedora/os x/ubuntu) I can now cd into my most used directories, complete with tab completion, from anywhere on the cli.

  1. Install bash-completion, substituting appropriate package manager:

    brew install bash-completion
    
  2. OS X ONLY: append to your ~/.bash_profile:

    if [ -f $(brew --prefix)/etc/bash_completion ]; then
      . $(brew --prefix)/etc/bash_completion
    fi
    
  3. Everyone append to your ~/.bash_profile:

    export CDPATH=.:~:~/repos:~/sites
    
  4. Activate changes:

    source ~/.bash_profile
    
  5. Kick the tires, from say /tmp:

    me@local tmp$ cd my<TAB><TAB>
    my_blog/ my_app/
    

Tab completion should be working as you'd expect against all your favorite directories, no matter where you are on the cli. This made navigating around dozens of repos quite a bit easier for me, though for a handful of my most used ones I may still treat myself to a dedicated alias. Because I'm weak.


Tomato Advanced Firewall Settings

Note

This post is heinously out of date but I'm keeping it around for historical purposes anyway

A user commented on the Tomato Wake-on-LAN post:

I found I couldn’t get wake on lan to work at all until I enabled Advanced->Firewall->Allow multicast.

Well that made me wonder what all those advanced settings did, and turns out the descriptions available suck! Well sometimes there wasn’t even a description to label as “suck” so lets put some descriptions in Google that are at least marginally better. In italics is the setting explanation from the Tomato manual at Wikibooks:

Tomato advaned firewall settings

Respond to ICMP pingIf checked the router will respond to ping requests from on the WAN interface. (Default: unchecked)

If you plan on using Wake-on-LAN this must be checked or the router will ignore the Magic Packet that actually tells your computer to turn on. If you don’t need to access your network remotely you can leave it unchecked.

Allow multicastIf checked, the router will allow multicast packets to reach the LAN. (Default: unchecked)

Multicast is a “one-to-many” communication method so a computer can send data to several computers at once via a single packet, improving efficiency. It is frequently used for streaming video and you may notice performance gains/losses by enabling/disabling it, total crapshoot. You can leave this unchecked most likely. Just to be confusing some routers like Linksys call this option “filter multicast” in which case you would leave that setting checked to disable (i.e. filter out) the multicast packets.

NAT loopbackIf checked, the router allows LAN devices to reach other LAN devices via the router’s WAN IP address and a properly configured port forward. If unchecked, LAN devices can only contact other LAN devices via their local IP addresses. (Default: Forwarded only)

This one is a little complicated but DynDNS has a good description with a diagram. For example the loopback problem occurs when there is a webserver on the same subnet with you. If you try to visit that webserver by browsing to TheWebserver.com or whatever it’s domain is the router would try to send you out onto the internet to visit the site. Problem is the server isn’t out on the internet from your perspective, it’s on your local area network. Most users will want to leave this at the default setting of Forwarded only. If you want more crazy detail on what is happening this thread should prove helpful.

Enable SYN cookiesActivates SYN cookies. (Default: unchecked)

Probably the best description in the whole book! SYN cookies are a tool for thwarting a SYN flood, an older type of DoS attack. I would enable this unless you find it causing problems with your router. The Tomato developer has commented about sparse and unconfirmed reports of issues with the setting. Well that’s something at least, hopefully it’s all correct yeah?!


Wake-on-LAN: Configuring your PC, Tomato & iPhone

Note

This post is heinously out of date but I'm keeping it around for historical purposes anyway

So this article at Lifehacker got me thinking about setting up Wake-on-LAN (WoL) for my system. For several years I just left my PC on 24/7 to VNC into it anytime, which I stopped doing because it was a massive waste of electricity (i.e. money dollars). I don’t need into my computer remotely very often but WoL turned out to be the optimal solution for when I do. My personal setup required several things:

Enable WoL in the computer’s BIOS

  • Configure Linksys router running Tomato USB firmware
  • Setup DynDNS to always be able to locate my network from the internet
  • Find an iPhone app to send the “magic packet“, which tells your computer to turn on
  • Enabling WoL in your BIOS

Both my PCs are somewhat older and don’t have settings labeled “Wake-on-LAN” but instead “Wake-on-PME” (power management event) which is the same thing, enable the option and boot your computer.

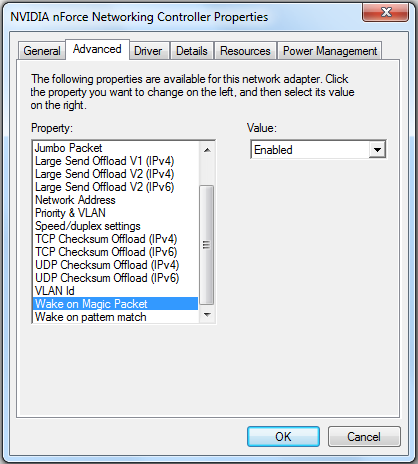
On Windows 7 both my machines had WoL enabled by default but to verify you can open your network adapter in Device Manager and check the Advanced tab to see if the property pertaining to WoL is enabled. For me one machine used the property “Wake on Magic Packet” and the value “Enabled”, another used the property “Wake-On-LAN Capabilities” and the value “Pattern Match & Magic Packet”. It’s all driver specific so yours could be a variation of those.

Ethernet adapter in Device Manager:

Wake-on-LAN Device Manager

WoL doesn’t always work when the computer is off (depends on the machine), because the network card has no power and thus can’t receive the magic packet, so your PC may have to be in Sleep or Hibernate mode. In Win7 you can change the default shutdown option to hibernate; click the Start orb and right click on Shutdown, choose properties, change the Power button action drop-down to Hibernate and click OK.

Configuring Tomato for WoL

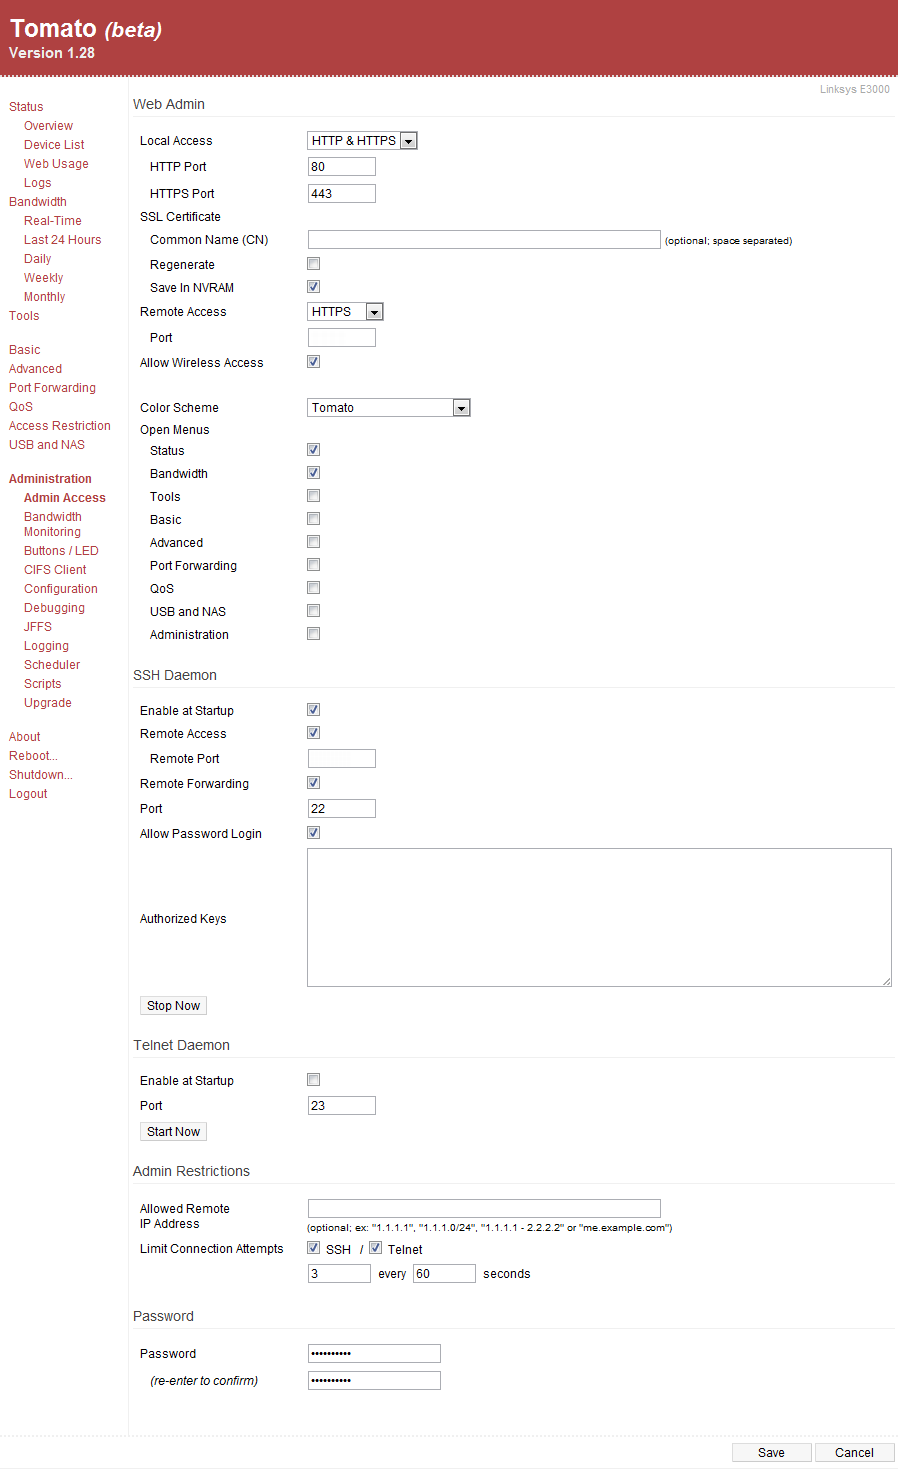
After you have Tomato (or Tomato USB) installed take a few minutes to secure it for remote access. This will let you log into the web interface or SSH in to a command line for testing or other uses in the future.

Tomato has built in WoL functions under Tools->WOL where you can click any MAC address listed to send the wakeup command. For easier identification I’ve given all my devices static IPs and names under Basic->Static DHCP. Worst case you can always log into your router this way to boot your computer, bypassing the complexity and problems of WAN control as Tomato effectively sends the command from inside your LAN.

The hiccup for internet control of WoL is when your computer has been off for 20 minutes or so you won’t be able to send the magic packet from the WAN anymore. You can still login to Tomato and wakeup the computer but that’s it. This is because it’s address has expired from the ARP cache and you’re boned. The Tomato WoL page lists device status, if it is “Active (In ARP)” then internet WoL commands will work, otherwise no go.

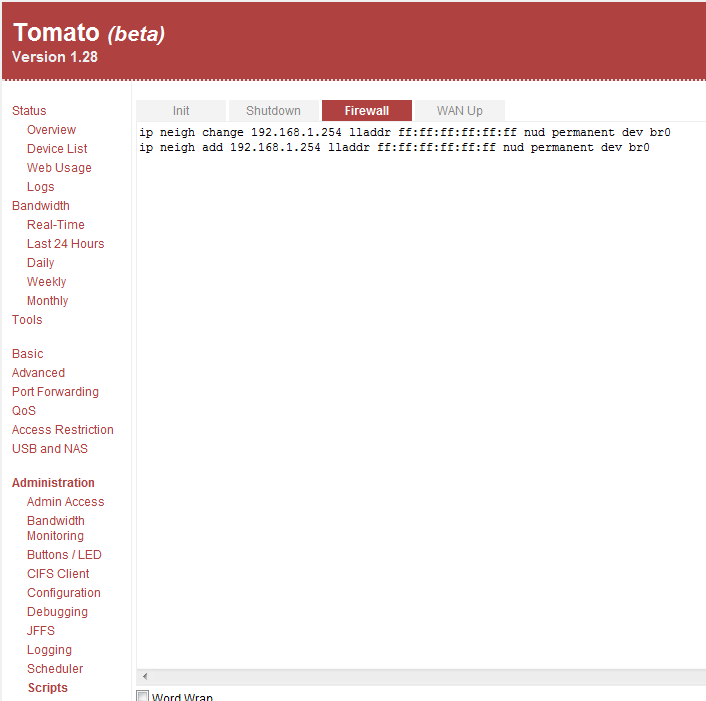
The solution is to send the magic packet to the broadcast address for your subnet (generally 192.168.1.255) but Tomato won’t allow that, so we work around it by turning 192.168.1.254 into the broadcast address by adding these two lines to Administration->Scripts->Firewall:

1
2
ip neigh change 192.168.1.254 lladdr ff:ff:ff:ff:ff:ff nud permanent dev br0
ip neigh add 192.168.1.254 lladdr ff:ff:ff:ff:ff:ff nud permanent dev br0

How Tomato looks:

Tomato firewall settings

Reboot your router. If you secured your router for remote access as suggested earlier, SSH into it and run the following command to see if the output includes your new settings:

1
2
user@server$ ip neigh show
192.168.1.254 dev br0 lladdr ff:ff:ff:ff:ff:ff PERMANENT

You’re in business, now go to Port Forwarding and setup a forward for UDP on some high port (5500, 8888, whatever) to internal address 192.168.1.254. Now internet originated magic packets will be broadcast to all devices on your network, but only the machines with the correct MAC address within that packet will respond.

This workaround of the ARP expiration problem does introduce a minor security issue that most home users can safely ignore. We’ve created what is called a Subnet Directed Broadcast which if an attacker knows your WAN IP, the port number you forwarded, and that there is a SDB on that port they could initiate a type of DDoS called a Smurf attack. In reality you could be just as easily DDoS’ed without SDB set up and besides, the bad people are more concerned with infecting your PC to steal data, sell you fake anti-virus software or act as a zombie in some botnet, not blocking you from playing World of Warcraft.

Setup DynDNS to locate your network from the internet

While you could just use your WAN IP address directly, available from the Tomato status page or icanhazip.com, the pro route is to setup a DDNS (Dynamic DNS) service like DynDNS as detailed here. That way you get an easy to remember subdomain like SweetMeats.DynDNS.org and when your ISP inevitably changes your IP address Tomato will notify DynDNS and you won’t notice anything has happened.

At this point you should be able to boot your computer via the internet, hibernate your computer and use this handy website to send a magic packet. If my instructions are worth their salt you should hear your loud-ass computer booting up, WHIRRR.

Sending the Magic Packet from your iOS Device

I tried a few WoL iPhone apps before settling on RemoteBoot Lite which is free and works perfectly. For the most part paid WoL apps in the AppStore are ripoffs, why pay $3+ for a function as basic as sending the magic packet? Anyways, type in your DynDNS domain under Name, the MAC address to your computer (from Tomato: Status->Device List or via other methods), tap the DNS button which will resolve your domain to an IP address and set Target Port to whichever port you setup for UDP forwarding earlier.

RemoteBoot Lite

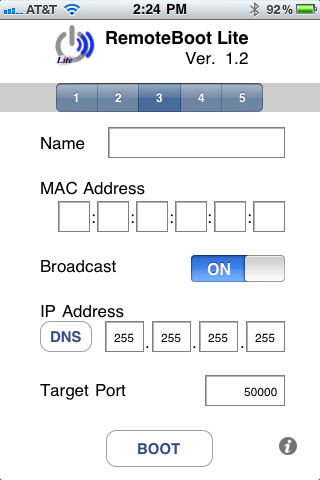
That’s it, tap the Boot button and if your computer is hibernating or asleep it should wake up. It took a lot of trial and error to get to this point however and I did a lot of backtracking so don’t give up if it doesn’t work on your first attempt, but if I was to do it all over again this would be the shortest path.

Well this ended up being a lot more in-depth than originally intended. Hopefully someone can use it.


Securely Access Your Tomato Router Remotely

Note

This post is heinously out of date but I'm keeping it around for historical purposes anyway

While I was configuring Wake-on-LAN for my computers I took some time to enable remote access to my Tomato router and secure it properly, this forum post was especially helpful. Under Administration->Admin Access the most important settings are:

  • Under Local Access choose HTTP & HTTPS or just HTTPS, the default ports of 80 and 443 respectively are fine, as this is behind the firewall that is your router.

  • Under Remote Access select HTTPS and choose an unused port, something like 2525 or 8998.

  • For the SSH Daemon check Enable at Startup, Remote Access, choose an unused port for Remote Port as above, check Remote Forwarding and leave at the default port of 22 and check Allow Password Login.

  • Disable Telnet Daemon, it’s too insecure to ever consider using. Also you can Limit Connection Attempts to some low-ish number for bonus security.

  • Finally choose Password that isn’t embarrassingly easy to crack, such as happened with Anonymous vs HBGary and Gawker accounts recently.

Instead of Allow Password Login some people prefer use the Authorized Keys option, which is fine as it is generally more secure than a password, but also more of a hassle in a home network setting. Since you can already log into the router’s interface with a password what is the big deal about using SSH with a password? Nothing that’s what. If you’d like to go the Key route this is a good walkthrough using PuTTYgen.

Speaking of PuTTY you should go download it, as it is the best SSH client available for windows and it’s free. If you’re not familiar with PuTTY this is a handy guide. Now you should be able to connect to your router remotely though your WAN IP (easier if you’ve setup a DynDNS account) and the Remote Access port you selected above. In a pinch you can also use SSH from your iPhone but from what I’ve read the only free SSH app is the Rove Mobile Admin Client, of course there are plenty of paid ones such as iSSH if you’ve got $10 to blow.

Tomato admin setup


Sync and Secure FileZilla with Dropbox

Note

This post is heinously out of date but I'm keeping it around for historical purposes anyway

Searching for more ideas of how to synchronize my computers with Dropbox and secure them with KeePass led me to a way to sync both the settings and FTP site list for FileZilla. FileZilla is of course the best FTP client available so if you aren’t currently using it, start. It does have one horrible problem though, it stores your passwords as plaintext! That is easily fixed though, onward:

FileZilla config file

Building off this guide the method is:

  1. Create a directory called “FileZilla” in your Dropbox folder

  2. Open FileZilla, File->Export check “export site manager entires” and save it in your new FileZilla folder in Dropbox as “sitemanager.xml” and close FileZilla

  3. Go to the install location of FileZilla, probably C:\Program Files (x86)\FileZilla FTP Client\Docs

  4. Open the “fzdefaults.xml.example” in a text editor

  5. Scroll down to the area you see in the picture at right, delete everything between and including . That is an example site which you don’t need, and your sites are in sitemanager.xml anyways.

  6. In the “Config location” setting change $SOMEDIR/filezilla/ to the path to your Dropbox filezilla folder, probably C:\Users\\Dropbox\FileZilla This is the folder FileZilla will start storing your filezilla.xml (settings) and sitemanager.xml (ftp site list) files, among other config files.

  7. BONUS: For extra security change “Kiosk mode” to 1, this will stop FileZilla from remembering passwords which are embarrassingly stored as plaintext in the sitemanager.xml file!! Use KeePass to manage your FTP passwords instead, less convenient but infinitely more secure. (This forum post gives an explanation of why the passwords are plaintext)

  8. Save the edited file as “fzdefault.xml” in the “FileZilla FTP Client” folder. If Windows won’t let you save there because you need admin privileges, just save it on your desktop then drag it into the Client folder manually.

That should be it, open FileZilla and all your sites should be in Site Manager. Whatever sites or settings you change now will sync to your other installs after they are configured this way. Also if you are changing settings I like to set my FileZilla theme to 32×32 OpenCrystal, gives it a nice look.


Meebo Ruined My Birthday

Note

This post is heinously out of date but I'm keeping it around for historical purposes anyway

A few days ago I hear Meebo will finally be releasing an iPhone app on Tues Feb 16th. A red letter date in history, to nobody! So being giddy with anticipation, as existing iPhone IM apps are universally terrible, I download the app last night. First thing I try to do is add my main Google Talk account, rather a Google Apps account, to Meebo. Meebo no likey. It is sometime after midnight and I'm in bed, but I can see a bout of Googling is in my future. So I get up, retrieve my laptop and go to work. After 45 minutes the verdict is in, I'm S.O.L.

"Enjoy a dollop of dump on your cake!" - The Meebo Team

The apparent hangup? Meebo hasn't figured out how to properly support Google Apps like say, oh, EVERY OTHER IM APP. Now, Meebo maintains a wiki where they enthusiastically state you can "absolutely!" use your Google Apps account...if you can modify obscure DNS SRV records with your hosting company. That is an Oprah sized qualifier there. Many massive domain hosting companies, such as 1and1 and Yahoo, do not let you modify SRV records. I ran across a this small list of hosts that do/don't allow SRV modding. Not that it should even be necessary, as I mentioned EVERY OTHER IM APP supports Google Apps!

Well what does Meebo say about proper Apps support? Er, well nothing. This post from 2 1/2 years does not give me warm feelings that they will modernize their systems anytime soon. Additionally they shutdown registrations on their forum so I couldn't ask about progress. I decided to ask 1and1, my domain host, if SRV updating was possible, but they replied it was only available for dedicated server accounts and had no plans to add it for the plebs.

So here I am taking it coming from Meebo and going from 1and1, still shackled desktop chat. Ironically, Pidgin is the only thing that didn't shit on me!


My Hand Was Forced

Note

This post is heinously out of date but I'm keeping it around for historical purposes anyway

Do I love or hate computers for bringing me to this? The question is probably irrelevant as I and they are forever inextricably entwined. Of course, I will never make peace with that fact. And on this terrible foundation why would I create a blog, a medium so thoroughly disrespected it doesn't even make a good punchline anymore? Because I'm out of touch! I just made a goddamn blog for Christ sake, try to keep up. However, in addition to being out of touch I also spend a lot of time figuring out computer shit. Are the two correlated? Would an autopsy reveal that?

Now this aforementioned "computer shit." How do we "computer people" fix "computer shit?" Google. We generally don't have a solution to a problem, but we can spend a little/lot/ridiculous/what-does-my-life-mean amount of the day Googling for one! Then, after some painful reflecting time, I need a dumpster in which to place what I have learned about said problem. Hello dumpster!

So in the name of meager goals, the hope is some of the crap I splatter across these walls will be indexed by the great search engines of the world. Then perhaps it will save people of my ilk a few minutes while doing their own Googling (painful reflecting) and somehow, someone gets a Ferrari.

© Justin Montgomery. Built using Pelican. Theme is subtle by Carey Metcalfe. Based on svbhack by Giulio Fidente.